This is an example on how to create a shell script in AIX to transfer file using XCOM tool. Pre-requisite for this task is to have:
1) CA – XCOM installed successful
2) To have necessary access to execute xcomtcp command\
To execute XCOM file transfer, xcomtcp command is the syntax to be used and a few options for the file transfer setting. Create an empty file i.e. test.sh and put the following script:
cd /app/xcom/test
#Delete status file if exist
if [ -f success.txt ];
then
rm success.txt
elif [ -f fail.txt ]
then
rm fail.txt
fi
#Start file transfer
xcomtcp -c1 -f test.cnf LOCAL_FILE=./test.txt REMOTE_FILE=C:/test/test.txt PROTOCOL=TCPIP XENDCMD=./status.sh
In above example script, two status file will be deleted first if they exist. success.txt is the success file and fail.txt will be generated if the transfer file failed. Both file creation will be written in status.sh script file.
In xcomtcp command above, test.cnf configuration file will be used. There are a lot of option in the config file that can be use, for example userid and password. If you want to override the setting in config file, just write it in the xcomtcp command as above. In above example, attribute that being overide is the local file, remote file and protocol setting in config file with the value stated in the example. XENDCMD is actually in xcom.glb file, which is the another config file for XCOM. It’s function is to execute script once file transfer is done.
Below are the status.sh sample scipt to be executed after xcomtcp command is completed:
# This procedure is invoked by the Unicenter CA-XCOM Data Transport transfer
# program after the transfer is finished (whether successful or not).
# Not every argument will be populated;
# the values contained in the arguments depend on those provided by the
# remote system.
###### START OF DEBUG SECTION ######
######
###### UNCOMMENT THE LINES BELOW TO DEBUG THIS SCRIPT ######
#exec > /tmp/xcomend.$1.out
#exec 2>&1
#set -vx
#PS4='[$0: $LINENO]+ '
#export PS4
###### END OF DEBUG SECTION ######
#
# The first parameters are supplied for any type of transfer.
local_reqno=$1 # local request number/tid (000000 if unassigned)
shift
initiator=$1 # LOCAL or REMOTE
shift
transfer_type=$1 # FILE or JOB or REPORT
shift
direction=$1 # SEND or RECEIVE
shift
restarting=$1 # RESTARTING or FIRST_TRY
shift
start_time=$1 # Start time of transfer
shift
end_time=$1 # End time of transfer
shift
remote_system=$1 # Remote system name
shift
status=$1 # Status of transfer
shift
error=$1 # XCOM file transfer numeric error code
shift
msg=$1 # error code translated to message text
shift
status_msg=$1 # status message from partner when error on remote sys
shift
remoteuser=$1 # Remote user
shift
remote_reqno=$1 # Remote request Number
shift
group=$1 # Group name
shift
sysdata=$1 # System Dependent User Data
shift
xferdata=$1 # Transfer Dependent User Data
shift
transfer_name=$1 # Transfer Name
shift
tmp_file=$1 # Local temporary file name
shift
file=$1 # Local file name
shift
remote_file=$1 # Remote file name
shift
carriage_flag=$1 # Carriage return flag
shift
code_flag=$1 # Code flag
shift
compression=$1 # Compression flag
shift
file_recs=$1 # No. of records read/written
shift
file_bytes=$1 # No. of bytes read/written
shift
blocks=$1 # No. of blocks sent/received
shift
bytes=$1 # No. of bytes sent/received
shift
#
# The next parameters are supplied for file transfers only
if [ $transfer_type = "FILE" ]
then
fileaction=$1 # File action (C, R, or A for create, replace, or append)
shift
datasettype=$1 # Dataset type
shift
recfm=$1 # Record format
shift
lrecl=$1 # Logical record length
shift
truncation_flag=$1 # Truncation flag
shift
#
# The next group of parameters are supplied for report transfers only
elif [ $transfer_type = "REPORT" ]
then
jobname=$1 # Job name field from JES
shift
jobnumber=$1 # Job number field from JES
shift
class=$1 # print class
shift
copies=$1 # Number of copies to print
shift
form=$1 # Type of form to print this job on.
shift
recfm=$1 # Record format of incoming print job.
shift
lrecl=$1 # Logical record length of incoming report.
shift
blksize=$1 # Block size of incoming report.
shift
ucs_name=$1 # Name of UCS to be used for this print job.
shift
fcb=$1 # Name of FCB (form control block) for this report.
shift
room_number=$1 # Room number field from JES.
shift
programmer_name=$1 # Programmer name field from JES.
shift
tso_notify=$1 # TSO notify field from JES.
shift
destination=$1 # Destination printer specification.
shift
carriagecontrol=$1 # Type of carriage control characters being used.
shift
#
# There are no extra parameters for remote jobs
fi
#
# PUT YOUR OWN XCOM ENDING CODE HERE !
if [ $status = "SUCCESSFUL" ]
then
echo 'Start time : ' $start_time >> success.txt
echo 'End time : ' $end_time >> success.txt
echo 'File name : ' $file >> success.txt
elif [ $status = "FAILED" ]
then
echo 'Start time : ' $start_time >> fail.txt
echo 'End time : ' $end_time >> fail.txt
echo 'Error message : ' $msg >> fail.txt
echo 'Remote error message : ' $status_msg >> fail.txt
echo 'File name : ' $file >> fail.txt
fi
exit 0
Give focus on few line of code at the end of the script. After # PUT YOUR OWN XCOM ENDING CODE HERE ! comment, you can put your own script on how to manipulate all variable define in the beginning of the script into your own.
Saturday, January 7, 2012
CA – XCOM : Powerfull file transfer tool
XCOM is a file transfer tool to transfer file from mainframe to Unix/Window server or between server to server. To use XCOM in mainframe, you need to have a special RACF permission:
1) Read access to dataset (CAI.XCOM.**) for id XXXXXX
2) Define OMVS SEGMENT for XXXXXX
3) READ to EZB.NETACCESS.XXXX.TCPIP.XXXX CL(SERVAUTH) for id XXXXXX
If you do not define OMVS Segment to your id, you will get XCOMM0780E Txpi 224: gethostname error return value = 156 error, and you JCL job will ended with XFER XFERM1 - ENDED BY CC 0009.
If you do not have access to EZB.NETACCESS.XXXX.TCPIP.XXXX service, you’ll be ended with XCOMM0780E Txpi 211: Socket connect error return value = 111 error with the same JCL job abend code.
In order to transfer to a PC or server, you need to have XCOM agent or software to be installed in those target machines. The usual port that it used is 8044 for normal transfer and 8045 if using SSL for secured transfer. However XCOM port is configurable and you can use any of available port in your machine.
Example of XCOM JCL :
//XFERM01 EXEC XCOMSEND,XTYPE=EXECUTE
//SYSIN DD *
TYPE=SEND
FILETYPE=FILE
IPNAME=192.1.1.1
FILE=D:\TEST.zip
LFILE=XXX.TEST.FILE1
RECSEP=YES
CODE=BINARY
TRUNCATE=NO
COMPRESS=NO
PACK=NO
CKPT=0
FILEOPT=REPLACE
USERID=yourid
PASSWORD=password
How to invoke SAS GUI (unix) using X Window
If you are a SAS user on Unix/Linux, you might want to use X Window for your SAS application. In my example, I’ll show you how to invoke SAS 9.2 for Unix/Linux from a windows based OS using batch script.
We will need two main components:
1) X Windows – I’m using a free Xming software version 6.9.0.31
2) SAS 9.2 for Unix/Linux
In this example, we assume that SAS 9.2 have been installed in a Unix box. Next, install Xming in your windows machine. Run Xming-6-9-0-31-setup.exe. Just click next and accept default setting. During Xming installation, it will also install plink – a command prompt putty which will be use to connect to the Unix box.

Next step is to create a batch script in your windows machine. Create an empty batch file (create a file and rename it to something.cmd) and put the following script in the file:
@echo off
@ You can set any comment here
COLOR 17
mode con:cols=82 lines=30
TITLE Put title here
echo########################################################################
echo# #
echo# #
echo# #
echo# #
echo# You can put your own text here #
echo# #
echo# ...........Starting SAS 9.2......... #
echo# #
echo# #
echo# #
echo# #
echo########################################################################
start "" C:\Progra~1\Xming\Xming.exe :0 -clipboard -multiwindow
plink -ssh -X -pw password yourid@192.1.1.1 ./startsas
I’ve created a soft link inside the server and put the link inside /home/yourid so that I can run the SAS start command inside my home directory. You can manipulate the way you start the SAS software depending on your SAS setup. Make sure port 22 is open in order to connect to the server via SSH protocol. The –X option in the plink command enable the usage of X Windows so that SAS can be run using GUI. You will see something like this when running the script:
 The script will automatically start the Xming software, and then connecting to Unix box to run SAS software. So now you only have single click to run your SAS Unix software in your windows machine! You can modify the script according to your need i.e. prompting password if you don’t want to hard code your password inside the script.
 To terminate the script/SAS, just click on terminate button in one of the SAS panel.

We will need two main components:
1) X Windows – I’m using a free Xming software version 6.9.0.31
2) SAS 9.2 for Unix/Linux
In this example, we assume that SAS 9.2 have been installed in a Unix box. Next, install Xming in your windows machine. Run Xming-6-9-0-31-setup.exe. Just click next and accept default setting. During Xming installation, it will also install plink – a command prompt putty which will be use to connect to the Unix box.
After Xming installation, you will see Xming icon in your desktop as per picture above. Ensure to update PATH variable to Xming installation directory which plink.exe reside (i.e. C:\Program Files\Xming), in order for us to run plink anywhere in our Windows machine.
Next step is to create a batch script in your windows machine. Create an empty batch file (create a file and rename it to something.cmd) and put the following script in the file:
@echo off
@ You can set any comment here
COLOR 17
mode con:cols=82 lines=30
TITLE Put title here
echo########################################################################
echo# #
echo# #
echo# #
echo# #
echo# You can put your own text here #
echo# #
echo# ...........Starting SAS 9.2......... #
echo# #
echo# #
echo# #
echo# #
echo########################################################################
start "" C:\Progra~1\Xming\Xming.exe :0 -clipboard -multiwindow
plink -ssh -X -pw password yourid@192.1.1.1 ./startsas
I’ve created a soft link inside the server and put the link inside /home/yourid so that I can run the SAS start command inside my home directory. You can manipulate the way you start the SAS software depending on your SAS setup. Make sure port 22 is open in order to connect to the server via SSH protocol. The –X option in the plink command enable the usage of X Windows so that SAS can be run using GUI. You will see something like this when running the script:


Labels:
open source,
software

How to use X Windows with Putty
People usually use X Windows to invoke GUI in Unix/Linux or AIX box. Some of the X Windows software is proprietary, and some is free. I’m using Xming version 6.9.0.31 and sometimes Cygwin-X, to run SAS 9.2 GUI or to install Oracle Client and Informatica 9.1.0 or even OBIEE installation using GUI interface (OBIEE installation required some special font, cannot use Xming version 6.9.0.31 – need extra font, it’s working if using Cygwin-X)


To use Putty together with Xming, you just need to enable X11 port forwarding in Putty configuration for SSH tunelling (see picture below). If you are using plink (Putty command line), just use option –X to enable the X11 port forwarding i.e. plink -ssh -X –pw password yourid@192.1.1.1 ./startsas.


Running SAS 9.2 in AIX

Installing Oracle Application Server – part of OBIEE installation using Cygwin-X

Installing Informatica 9.1.0 using Xming

Installing Oracle Client 11g using Xming
To use Putty together with Xming, you just need to enable X11 port forwarding in Putty configuration for SSH tunelling (see picture below). If you are using plink (Putty command line), just use option –X to enable the X11 port forwarding i.e. plink -ssh -X –pw password yourid@192.1.1.1 ./startsas.

Labels:
open source,
software
Tuesday, March 9, 2010
Calculate the space by yourself
1) Calculate the space by yourself!!! (1 CYL how many TRKS, 1 TRKS how many BYTES, 1 CYL how many KB, 1 TRK how many KB, 1 MB how many KB, 1 GB how many KB)
1 CYL = 720KB
1 CYL = 15 TRKS
1TRK = 56664 BYTES
1 TRK = 55.33 KB
1 MB = 1024 KB
1 GB = 1,048,376 KB
1 CYL = 720KB
1 CYL = 15 TRKS
1TRK = 56664 BYTES
1 TRK = 55.33 KB
1 MB = 1024 KB
1 GB = 1,048,376 KB

Labels:
mainframe
How to get big space in your mainframe system
Do you always encounter the following problem when extracting large data? E37? SE37? B37? Maximum volume reached? Tips: Where to search for such error message? Go to your job spool and browse JESYSMSG. Browse to the bottom and start searching where your job abended/stop from bottom to up. There are a few steps can be taken to allow your job to be able to use big storage for your file.
1) Check how much do you request for storage. Bear in mind not necessarily you define a big storage you can get what you are requested. In my environment (Z/OS 1.7 Operating System) I can get a file with multiple volume number assigned by SMS up to 59 volumes. If more volume is needed then I’ll hit by the “Maximum volume reached” error.

2) A very good step is to calculate what is your required space needed by calculating the output file size.
EXAMPLE, 391,227 records of FB LRECL=90
INTEGER (27998/90) = 311. Therefore 622 records will fit one track.
391227 / 622 = 628.9823 = 629 tracks required.
629 / 15 = 41.93333 = 42 cylinders required to store your data.
3) Check you are in which SMS pool. Select one of your file and see the volume information. Tips: Press F11 until you see volume as per example below:
 4) Copy the volume number and go to =3.4. Then paste it in “Volume serial” input column and type “V” in the option line. Press enter.
 5) You will see information as per picture below. Under Volume Data you can see how many tracks are in the volume. The bigger the size of the volume, the higher chances you will get big space for your dataset, and the lower chances you’ll be hit by the “Maximum volume reached” error.
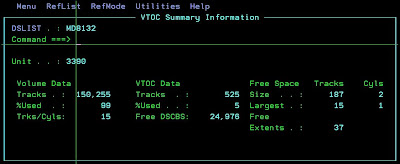
6) Ask your system programmer who in charge of storage to give you access to the volume with high number of tracks.
1) Check how much do you request for storage. Bear in mind not necessarily you define a big storage you can get what you are requested. In my environment (Z/OS 1.7 Operating System) I can get a file with multiple volume number assigned by SMS up to 59 volumes. If more volume is needed then I’ll hit by the “Maximum volume reached” error.
2) A very good step is to calculate what is your required space needed by calculating the output file size.
EXAMPLE, 391,227 records of FB LRECL=90
INTEGER (27998/90) = 311. Therefore 622 records will fit one track.
391227 / 622 = 628.9823 = 629 tracks required.
629 / 15 = 41.93333 = 42 cylinders required to store your data.
3) Check you are in which SMS pool. Select one of your file and see the volume information. Tips: Press F11 until you see volume as per example below:
4) Copy the volume number and go to =3.4. Then paste it in “Volume serial” input column and type “V” in the option line. Press enter. 5) You will see information as per picture below. Under Volume Data you can see how many tracks are in the volume. The bigger the size of the volume, the higher chances you will get big space for your dataset, and the lower chances you’ll be hit by the “Maximum volume reached” error.6) Ask your system programmer who in charge of storage to give you access to the volume with high number of tracks.
Labels:
mainframe
Subscribe to:
Posts (Atom)