This is an example on how to create a shell script in AIX to transfer file using XCOM tool. Pre-requisite for this task is to have:
1) CA – XCOM installed successful
2) To have necessary access to execute xcomtcp command\
To execute XCOM file transfer, xcomtcp command is the syntax to be used and a few options for the file transfer setting. Create an empty file i.e. test.sh and put the following script:
cd /app/xcom/test
#Delete status file if exist
if [ -f success.txt ];
then
rm success.txt
elif [ -f fail.txt ]
then
rm fail.txt
fi
#Start file transfer
xcomtcp -c1 -f test.cnf LOCAL_FILE=./test.txt REMOTE_FILE=C:/test/test.txt PROTOCOL=TCPIP XENDCMD=./status.sh
In above example script, two status file will be deleted first if they exist. success.txt is the success file and fail.txt will be generated if the transfer file failed. Both file creation will be written in status.sh script file.
In xcomtcp command above, test.cnf configuration file will be used. There are a lot of option in the config file that can be use, for example userid and password. If you want to override the setting in config file, just write it in the xcomtcp command as above. In above example, attribute that being overide is the local file, remote file and protocol setting in config file with the value stated in the example. XENDCMD is actually in xcom.glb file, which is the another config file for XCOM. It’s function is to execute script once file transfer is done.
Below are the status.sh sample scipt to be executed after xcomtcp command is completed:
# This procedure is invoked by the Unicenter CA-XCOM Data Transport transfer
# program after the transfer is finished (whether successful or not).
# Not every argument will be populated;
# the values contained in the arguments depend on those provided by the
# remote system.
###### START OF DEBUG SECTION ######
######
###### UNCOMMENT THE LINES BELOW TO DEBUG THIS SCRIPT ######
#exec > /tmp/xcomend.$1.out
#exec 2>&1
#set -vx
#PS4='[$0: $LINENO]+ '
#export PS4
###### END OF DEBUG SECTION ######
#
# The first parameters are supplied for any type of transfer.
local_reqno=$1 # local request number/tid (000000 if unassigned)
shift
initiator=$1 # LOCAL or REMOTE
shift
transfer_type=$1 # FILE or JOB or REPORT
shift
direction=$1 # SEND or RECEIVE
shift
restarting=$1 # RESTARTING or FIRST_TRY
shift
start_time=$1 # Start time of transfer
shift
end_time=$1 # End time of transfer
shift
remote_system=$1 # Remote system name
shift
status=$1 # Status of transfer
shift
error=$1 # XCOM file transfer numeric error code
shift
msg=$1 # error code translated to message text
shift
status_msg=$1 # status message from partner when error on remote sys
shift
remoteuser=$1 # Remote user
shift
remote_reqno=$1 # Remote request Number
shift
group=$1 # Group name
shift
sysdata=$1 # System Dependent User Data
shift
xferdata=$1 # Transfer Dependent User Data
shift
transfer_name=$1 # Transfer Name
shift
tmp_file=$1 # Local temporary file name
shift
file=$1 # Local file name
shift
remote_file=$1 # Remote file name
shift
carriage_flag=$1 # Carriage return flag
shift
code_flag=$1 # Code flag
shift
compression=$1 # Compression flag
shift
file_recs=$1 # No. of records read/written
shift
file_bytes=$1 # No. of bytes read/written
shift
blocks=$1 # No. of blocks sent/received
shift
bytes=$1 # No. of bytes sent/received
shift
#
# The next parameters are supplied for file transfers only
if [ $transfer_type = "FILE" ]
then
fileaction=$1 # File action (C, R, or A for create, replace, or append)
shift
datasettype=$1 # Dataset type
shift
recfm=$1 # Record format
shift
lrecl=$1 # Logical record length
shift
truncation_flag=$1 # Truncation flag
shift
#
# The next group of parameters are supplied for report transfers only
elif [ $transfer_type = "REPORT" ]
then
jobname=$1 # Job name field from JES
shift
jobnumber=$1 # Job number field from JES
shift
class=$1 # print class
shift
copies=$1 # Number of copies to print
shift
form=$1 # Type of form to print this job on.
shift
recfm=$1 # Record format of incoming print job.
shift
lrecl=$1 # Logical record length of incoming report.
shift
blksize=$1 # Block size of incoming report.
shift
ucs_name=$1 # Name of UCS to be used for this print job.
shift
fcb=$1 # Name of FCB (form control block) for this report.
shift
room_number=$1 # Room number field from JES.
shift
programmer_name=$1 # Programmer name field from JES.
shift
tso_notify=$1 # TSO notify field from JES.
shift
destination=$1 # Destination printer specification.
shift
carriagecontrol=$1 # Type of carriage control characters being used.
shift
#
# There are no extra parameters for remote jobs
fi
#
# PUT YOUR OWN XCOM ENDING CODE HERE !
if [ $status = "SUCCESSFUL" ]
then
echo 'Start time : ' $start_time >> success.txt
echo 'End time : ' $end_time >> success.txt
echo 'File name : ' $file >> success.txt
elif [ $status = "FAILED" ]
then
echo 'Start time : ' $start_time >> fail.txt
echo 'End time : ' $end_time >> fail.txt
echo 'Error message : ' $msg >> fail.txt
echo 'Remote error message : ' $status_msg >> fail.txt
echo 'File name : ' $file >> fail.txt
fi
exit 0
Give focus on few line of code at the end of the script. After # PUT YOUR OWN XCOM ENDING CODE HERE ! comment, you can put your own script on how to manipulate all variable define in the beginning of the script into your own.
Showing posts with label mainframe. Show all posts
Showing posts with label mainframe. Show all posts
Saturday, January 7, 2012
Tuesday, March 9, 2010
Calculate the space by yourself
1) Calculate the space by yourself!!! (1 CYL how many TRKS, 1 TRKS how many BYTES, 1 CYL how many KB, 1 TRK how many KB, 1 MB how many KB, 1 GB how many KB)
1 CYL = 720KB
1 CYL = 15 TRKS
1TRK = 56664 BYTES
1 TRK = 55.33 KB
1 MB = 1024 KB
1 GB = 1,048,376 KB
1 CYL = 720KB
1 CYL = 15 TRKS
1TRK = 56664 BYTES
1 TRK = 55.33 KB
1 MB = 1024 KB
1 GB = 1,048,376 KB

Labels:
mainframe

How to get big space in your mainframe system
Do you always encounter the following problem when extracting large data? E37? SE37? B37? Maximum volume reached? Tips: Where to search for such error message? Go to your job spool and browse JESYSMSG. Browse to the bottom and start searching where your job abended/stop from bottom to up. There are a few steps can be taken to allow your job to be able to use big storage for your file.
1) Check how much do you request for storage. Bear in mind not necessarily you define a big storage you can get what you are requested. In my environment (Z/OS 1.7 Operating System) I can get a file with multiple volume number assigned by SMS up to 59 volumes. If more volume is needed then I’ll hit by the “Maximum volume reached” error.

2) A very good step is to calculate what is your required space needed by calculating the output file size.
EXAMPLE, 391,227 records of FB LRECL=90
INTEGER (27998/90) = 311. Therefore 622 records will fit one track.
391227 / 622 = 628.9823 = 629 tracks required.
629 / 15 = 41.93333 = 42 cylinders required to store your data.
3) Check you are in which SMS pool. Select one of your file and see the volume information. Tips: Press F11 until you see volume as per example below:
 4) Copy the volume number and go to =3.4. Then paste it in “Volume serial” input column and type “V” in the option line. Press enter.
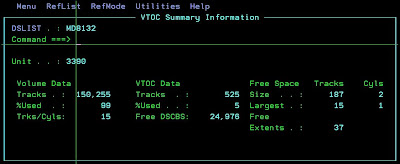
 5) You will see information as per picture below. Under Volume Data you can see how many tracks are in the volume. The bigger the size of the volume, the higher chances you will get big space for your dataset, and the lower chances you’ll be hit by the “Maximum volume reached” error.
6) Ask your system programmer who in charge of storage to give you access to the volume with high number of tracks.
1) Check how much do you request for storage. Bear in mind not necessarily you define a big storage you can get what you are requested. In my environment (Z/OS 1.7 Operating System) I can get a file with multiple volume number assigned by SMS up to 59 volumes. If more volume is needed then I’ll hit by the “Maximum volume reached” error.
2) A very good step is to calculate what is your required space needed by calculating the output file size.
EXAMPLE, 391,227 records of FB LRECL=90
INTEGER (27998/90) = 311. Therefore 622 records will fit one track.
391227 / 622 = 628.9823 = 629 tracks required.
629 / 15 = 41.93333 = 42 cylinders required to store your data.
3) Check you are in which SMS pool. Select one of your file and see the volume information. Tips: Press F11 until you see volume as per example below:
4) Copy the volume number and go to =3.4. Then paste it in “Volume serial” input column and type “V” in the option line. Press enter. 5) You will see information as per picture below. Under Volume Data you can see how many tracks are in the volume. The bigger the size of the volume, the higher chances you will get big space for your dataset, and the lower chances you’ll be hit by the “Maximum volume reached” error.6) Ask your system programmer who in charge of storage to give you access to the volume with high number of tracks.
Labels:
mainframe
Monday, March 8, 2010
How to read binary format data in flat file
To read binary format in file, for example here date, which was declare with PIC 9(9) binary, first we need to open the file. Below is the example of value in the file:

Type “hex on” in the command line to view the data in hex format. Since the date is declared as PIC 9(9), length used in the file is (9+1)/2 = 4. Tips: To view the column number, just type “cols”, and to remove the column number, type “res”. In example above, date 20100126 is now happen to be 0132B41E in hex format. Tips: To read hex value, start from left to right, read from up to bottom, and then next column, up to bottom until the end of data length.
If you know the data position but in hex format, how do you convert it into numeric/decimal format? The easiest way is to use this calculator in the internet:
Convert hex to decimal: http://easycalculation.com/hex-converter.php

If you intend to modify the data with the value you want, for example, from 20100126 to 20100127, you can use the following online calculator for this purpose:
Convert decimal to hex: http://easycalculation.com/decimal-converter.php

In this example, to change 20100126 to 20100127, you only need to change character “E” to “F” in the file.
Labels:
mainframe
Tuesday, October 9, 2007
Sunday, October 7, 2007
History of IBM Mainframe

“I predict that the last mainframe will be unplugged on March 15, 1996.” — Stewart Alsop,Infoworld,March 1991.
IBM introduce a mainframe called OS/360 in 1964. After that IBM produce more new mainframe each 10 years.
- System/370™ in 1970
- System/370 Extended Architecture (370-XA) in 1983
- Enterprise Systems Architecture/390® (ESA/390) in 1990 (i work in Heitech Padu at PNB Project using this mainframe for ASNB Unit Trust System)
- z/Architecture™ in 2000.
Why Mainframe? What Mainframe can do? IBM Mainframe is a self-contained processing center, powerful enough to process the largest and most diverse workloads in one secure “footprint,” and one that is just as effective when implemented as the primary server in a corporation’s distributed server farm. In effect, the mainframe computer is the definitive server in the client/server model of computing.
Thursday, June 14, 2007
IBM Personal Communications - Hot key like Microsoft Word and Dump Terminal?
IBM Personal Communications  is one of the popular emulator used to access mainframe or midrange, which we can set the emulator and use our keyboard to use several hot keys that widely used such as Copy, Paste and Cut. One of the way to copy and paste using shortcut key is by using Alt-E-C for copy and Alt-E-P for paste, which is more faster then using mouse to click on the Copy and Paste icon.
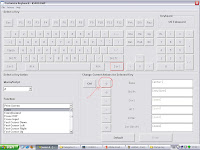
However there is another faster way to perform such function, and required some setting in the emulator. First click on the keyboard icon or select it from menu to change the keyboard setting. To set Copy function using the Control-C key, click on the C character, select "Edit Copy" from the function list menu, and then click on the arrow beside the "Ctrl" character (refer to the picture). Next, do the same to change the keyboard setting for Paste function to use Control-V hot key. Click on the V character and select "Edit Paste" from function list menu and then click on the arrow next to "Ctrl" character. To use Control-P key to print screen, choose "Print Screen" from the function list menu.
Some people might like to use "Control" key for "Enter" and "Enter" key for "Newline", same like the old Dump terminal. The step for setting this two key is the same and you can refer to the picture below.

 is one of the popular emulator used to access mainframe or midrange, which we can set the emulator and use our keyboard to use several hot keys that widely used such as Copy, Paste and Cut. One of the way to copy and paste using shortcut key is by using Alt-E-C for copy and Alt-E-P for paste, which is more faster then using mouse to click on the Copy and Paste icon.
However there is another faster way to perform such function, and required some setting in the emulator. First click on the keyboard icon or select it from menu to change the keyboard setting. To set Copy function using the Control-C key, click on the C character, select "Edit Copy" from the function list menu, and then click on the arrow beside the "Ctrl" character (refer to the picture).
 Next, do the same to change the keyboard setting for Paste function to use Control-V hot key. Click on the V character and select "Edit Paste" from function list menu and then click on the arrow next to "Ctrl" character. To use Control-P key to print screen, choose "Print Screen" from the function list menu.
 Some people might like to use "Control" key for "Enter" and "Enter" key for "Newline", same like the old Dump terminal. The step for setting this two key is the same and you can refer to the picture below.


Subscribe to:
Posts (Atom)